Star Commander Technical Documentation
Updated: 5/31/2026 :: Star Commander version 0.4.3a
Table of Contents#
> Debug Keybinds & The Debug Console
Keybinds :: The Console
> Game Packs
Overview :: Notes :: Json Spec :: The Coordinate System :: Folder Structure
> Ships
Overview :: Structure :: Example
> Ship paths
Overview :: Structure :: Example :: Custom Segments :: Notes
> Projectile types
Overview :: Example
> Levels
Overview :: Main Structure :: Level Data :: Example
> Menu Screens
Overview :: Main Structure :: Assets :: Buttons :: Example
> Translation
Overview :: Example
Debug Keybinds & The Debug Console#
Debug Keybinds#
Shift+Esc Forces the game to return to the main menu. If already on the main menu, this force closes the game.
Shift+F1 Toggles the debug overlay.
Shift+F2 Toggles the debug console and menus.
Shift+F3 Clears debug notifications.
Shift+F4 Toggles enemy ship damage.
Shift+F5 Toggles the virtual mouse.
Shift+F6 Sets the player’s position to the mouse cursor. Only effects the first player if in local multiplayer.
F11 Toggles fullscreen mode.
Debug Console#
The debug console keeps track of errors, and allows you to enter certain commands. Arguments are separated by spaces, following the command. For example: entering c_load_screen starmap_menu_4 will load the screen starmap_menu_4.
c_load_level
Loads a specified level file.
c_load_screen
Opens a specific screen.
c_load_game_pack
Sets the currently active game pack.
c_set_max_health
Sets the player’s max health (default is 100).
c_set_game_speed
Sets the game’s processing framerate. Default value is 60. This does not effect timers in levels, but can be usefull for testing.
Game Packs#
Overview#
Mods for the game are contained in folders, called game packs, in the game_packs/ directory of the save area. Game packs contain all of the required assets and data to create levels and ship types. Game packs cannot use assets or files from other game packs.
A template game pack with examples of most things listed below can be found here.
Notes#
All files in game packs are either .json/.jsonc data files, or .png texture files.
All angles/directions are in degrees with 0 being right and 90 being up.
If textures don’t properly load, but all file paths are correct, restart the game and try again.
Json Spec#
Star commander uses a very limited JsonC spec, currently only allowing comments using /* and */. Both .json and .jsonc file types are permitted, however JsonC spec is used regardless of filetype.
/*This is a comment!*/
The Coordinate System#
All screen coordinates in the game use a UV coordinate system from 100 to -100, with (0, 0) being the center of the screen. For example: (0, 100) would be the top middle, or (-100, -100) would be the bottom left.
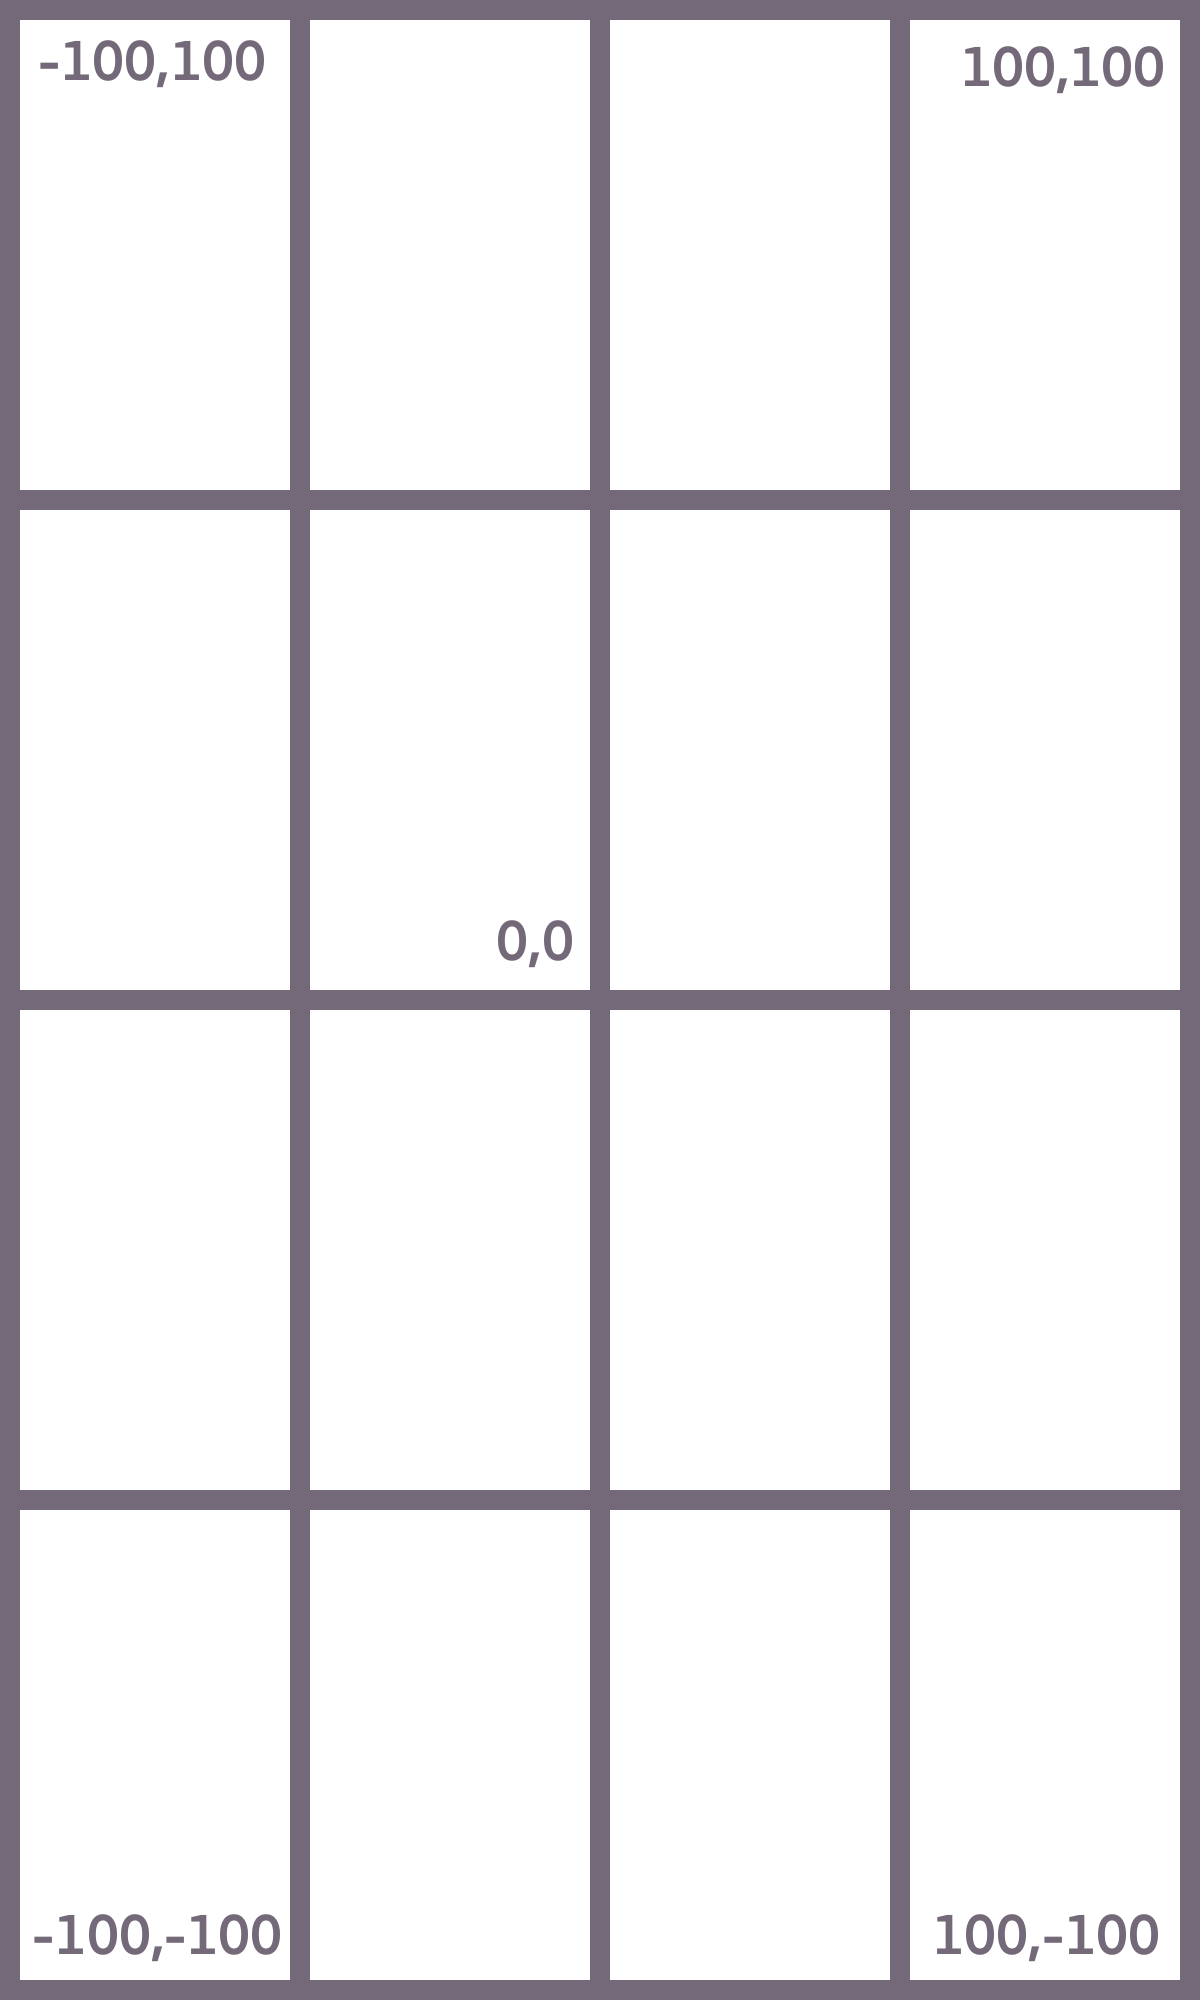
Sorry for the flashbang, I’ll make a dark mode version of this diagram at some point :)
Folder Structure#
This is a quick example of a very simple game pack. The purpose of these files will be explained later.
  example_game_pack/
  ├── assets/
  │   ├── projectile/
  │   │   ├── laser.png
  │   │   └── missile.png
  │   ├── screen/
  │   │   ├── button.png
  │   │   └── button_pressed.png
  │   └── ship/
  │       ├── ship_bomber.png
  │       └── ship_fighter.png
  ├── level/
  │   ├── level_1.json
  │   └── level_2.json
  ├── screen/
  │   ├── default.json
  │   └── screen_2.json
  ├── ship/
  │   ├── path/
  │   │   └── path_1.json
  │   ├── projectile/
  │   │   ├── projectile_laser.json
  │   │   └── projectile_missile.json
  │   └── type/
  │       ├── ship_bomber.json
  │       └── ship_fighter.json
  └── lang/
      ├── lang1.json
      └── lang2.json
Creating a ship#
Overview#
Ships are created with a ship definition json file in the [ship/type/] directory of your game pack. A ship’s movement is defined by a special file, called a path file, located in the [ship/path/] directory of your game pack. Ship textures are stored in the [assets/ship/] directory.
Json Structure#
sprite[string] Defines the file that the ship uses as its texture
path[string] Defines the path file that the ship uses for its movement
projectile[string] Defines the weapon definition file that the ship uses for its projectiles
projectile_spawn_offset(optional) [number] Amount (in pixels) to offset the ship’s projectiles when they are shot.
loop_path[boolean] Determines if the ship’s path loops or stops after completion
explosion_type[string] Either “small” or “large”. Determines the size of the ship’s explosion when it dies.
speed[number] Defines the speed that the ship travels at when moving (5 would be a normal speed, 10 would be pretty fast)
hp[number] Defines the ship’s starting health pool (the player does 10 damage by default, so a ship with 30 health would take 3 shots to kill)
invulnerable[boolean] Disables damage to the ship. When true, the player’s weapons will just pass through the ship, without dealing damage.
collision_damage[number] (optional)
Defines the amount of damage delt to the player when the ship collides with it. If omitted, no damage is delt and the enemy does not have collision. Value can be set to 0 to deal no damage while still applying knockback and effects.
Example:#
 {
     "sprite": "fighter_spaceship",
     "path": "strike_path_2",
     "projectile": "missile_4",
     "projectile_spawn_offset": 8,
     "loop_path": false,
     "explosion_type": "small",
     "speed": 5,
     "hp": 55
 }
This defines a ship that uses the texture assets/ship/fighter_spaceship.png, the path file ship/path/strike_path_2.json, the projectile type at ship/projectile/missile_4.json, has a speed of 5, and has 55 health points. The ship’s projectiles are offset 8 pixels in front of it when fired, and the ship has a small explosion when it is killed.
Creating a ship path#
Overview#
Ship paths are what define how a ship moves. They tell a ship where to fly, when to shoot, and how to do it. Ship paths are found in the ship/path/ directory. Ship paths are defined in “segments”, which are executed in order when a ship is spawned.
Json Structure#
curved_basic
Moves the ship along a curved path from its current position to a target position.
Arguments:x[number] the target x positiony[number] the target x position
curved_angle
Similar to curved_basic. Moves the ship along a curved path from its current position to a target position, but also uses dir value to make the ship’s path end with the ship facing a target angle.
Arguments:x[number] the target x positiony[number] the target x positiondir[number] the target angle
shoot_single
Shoots a single projectile at the player.
Arguments:projectile_type[string] (optional) the projectile to shoot. If omitted, the projectile type in the ship definition will be usedprojectile_dir[number] (optional) overrides the initial direction of the projectile
shoot_multi
Shoots multiple projectiles at the player, in a series.
Arguments:shots[number] the amount of projectiles for the ship to firedelay[number] the delay between each shotunits[string] the unit to use for delay, either “seconds” or “frames”projectile_type[string] (optional) the projectile to shoot. If omitted, the projectile type in the ship definition will be usedprojectile_dir[number] (optional) overrides the initial direction of the projectilepause_path[boolean] (optional) Determines if the ship stops while shooting
wait
Pauses the ship and waits the specified amount of time.
Arguments:time[number] the amount of time to wait forunits[string] the unit to use for delay, either “seconds” or “frames”
destroy_ship
Destroys the ship with an explosion animation.
No Arguments
delete_ship
Deletes the ship without any animation.
No Arguments
custom
Calls a custom path segmentid[string] the id of the custom path segment to call
set_pos
Sets the ship’s positionx[number] (optional) the target x positiony[number] (optional) the target y positiondir[number] (optional) the target angle
Example:#
 [
     {"type": "curved_basic", "x": 50, "y": 60},
     {"type": "shoot_single"},
     {"type": "curved_angle", "x": -30, "y": 30, "dir": -90},
     {"type": "shoot_multi", "shots": 5, "delay": 10, "units": "frames"},
     {"type": "wait", "time": 1, "units": "seconds"},
     {"type": "destroy_ship"}
 ]
This path causes a ship to do the following things in order:
- Go to the location (50, 60)
- Shoot one projectile at the player
- Go to the location (-30, 30), and end with an angle of -90
- Shoot 5 projectiles at the player, with 10 frames of delay between them
- Wait one second
- Explode the ship
Custom Segments#
Ship paths allow custom segments for more modularity. Custom segments are defined as json files in the /ship/path_segment/ directory. The json format is the same as a normal ship path. When a custom segment is called, the game inserts the custom segment into the path, and the path is used as normal.
For example: Using {"type": "custom", "id": "shoot_and_circle"} will find the path data in /ship/path_segment/shoot_and_circle.json and insert it into the path.
Notes#
If a ship goes off screen after its path is complete, it is best practice to use delete_ship to remove it from the game, because ships will not automatically despawn.
After using delete_ship or destroy_ship the ship is permanently deleted and any further actions on the path will not be executed.
Creating a projectile type#
Overview#
Projectile types are created in the ship/projectile/ directory of your game pack. Projectile types define how an enemy ship’s weapons behave. Projectile sprites are stored in the assets/projectile/ directory.
Json Structure
sprite[string] defines the file that the projectile uses as its texture
speed[number] The speed for a projectile to travel at. (Around 12.5 is a good default)
damage[number] The amount of damage for the projectile to deal to the player
homing[boolean] If the projectile tracks the player (used for missiles)
homing_turn_cap[number] (optional) The maximum speed for the projectile to turn while homing. Around 1 is a good default. 0.5 or less should be relatively easy to dodge, while 1.5+ is almost impossible. This field is required if homing is true.
Example:#
 {
     "sprite": "missile_4",
     "speed": 3,
     "damage": 20,
     "homing": true,
     "homing_turn_cap": 1
 }
This creates a projectile that uses the texture at assets/projectile/missile_4.png, has a speed of 3, deals 20 damage, and tracks the player.
Creating a level#
Overview#
Levels are defined in the level/ folder of your game pack. Levels are structured as a list of actions to perform, in order, primarily spawning enemy ships. They also define certain aspects of the player, ship positions, and in future versions of the game, backgrounds and effects.
Main Json Structure#
player_initial_x[number] The x position to spawn the player at
player_initial_y[number] The y position to spawn the player at
level_data[list] The data of the level (see below)
level_data - Json Structure#
level_data uses a similar system to ship paths, with segments executed in order to perform various actions.
spawn_enemySpawns an enemy with the given data.
Arguments:enemy_type[string] the enemy type file to usex[number] the x position to spawn the enemy aty[number] the y position to spawn the enemy atdir[number] the direction for the spawned enemy to start withmirror_path[boolean] determines if the ship’s path is or is not mirrored along the y axismodifiers[struct] (optional) Overrides properties of the spawned ship. Uses the same syntax as a ship type definition, can be used to change ship HP, path, sprite, etc.
wait
Waits a given amount of time
Arguments:time[number] the amount of time to wait forunits[string] the unit to use for delay, either “seconds” or “frames”
wait_for_kills
Waits until a certain number of a ship are destroyed. Does not keep track of kills after being called, but throughout the whole level. A ship that has been removed withdelete_shipordestroy_shipis counted as a kill. Arguments:ship_type[string] The type of ship to wait foramount[number] The amount of kills to wait for
return_to_menu
Warning: this is a temporary function for the purpose of development, and it will be removed at a later date.
Exits the level and quits to the main menu
No Arguments
show_tutorial_text
Displays a line of text at the top of the screen. This is primarily used in the tutorial
Arguments:text[string] the text to displaytime[number] the amount of time to wait for (in seconds)
open_screen
Opens a designated screen
Arguments:target[string] the screen to open
complete_level_to_screenFunctions the same asopen_screen, but with an animation. Arguments:target[string] the screen to open
Example:#
 {
      "player_initial_x": 0.0,
      "player_initial_y": -30.0,
      "level_data": [
              {"type": "wait", "time": 1.0, "units": "seconds"},
              {"type": "spawn_enemy", "enemy_type": "ship_template",
              "x": 0.0, "y": 110.0, "dir": 90.0, "mirror_path": false},
              {"type": "spawn_enemy", "enemy_type": "ship_template",
              "x": 0.0, "y": 110.0, "dir": 90.0, "mirror_path": true},
              {"type": "wait_for_kills", "ship_type": "ship_template", "amount": 2},
              {"type": "complete_level_to_screen", "target": "default"}
      ]
 }
This level spawns in the player at (0, -30), waits 1 second, spawns 2 enemies from the ship definition at ship/type/ship_template.json, one mirrored and one not, waits for them to be killed or deleted, then completes the level and returns to the game pack’s default screen.
Creating a screen#
Overview#
Screens are defined in the screen/ folder of the game pack. Screens are used to create menus for the player, primarily level selectors or maps. Assets for screens are stored in assets/screen/ Every game pack MUST have a screen at screen/default.json, which is loaded when the play button is clicked.
Main Json Structure#
The screen Json structure consists of the background texture, assets, and buttons.
background_sprite[string] The sprite asset used for the background texture. Pixel resolution is 120x200.
assets[list] A list of all of the sprite assets used in the screen. These are rendered behind buttons.
buttons[list] A list of all of the screen’s buttons.
assets - Json Structure#
x[number] The asset’s x position
y[number] The asset’s y position
sprite[string] The sprite to be used.
hover_text[string] (optional) The text displayed when the asset is hovered with the mouse.
buttons - Json Structure#
x[number] The button’s x position
y[number] The button’s y position
sprite[string] The sprite for the button to use.
sprite_pressed[string] The sprite for the button to use when pressed.
action[struct/array] The action when the button is pressed.
Has multiple types:start_level,open_screen, oropen_main_menu, with the first two requiring a target field. Buttons can also change game settings usingset_option, but this is currently unsupported and only supposed to be used in the game settings screen. Can be used as either a single structure, or an array of structures (used to execute multiple actions).
Examples (action):
{"action": [ {"type": "start_level", "target": "level_1"}, {"type": "set_option", "option": "high_contrast_background", "value": true} ] }
{"action": {"type": "open_screen", "target": "screen_starmap"} }
{"action": {"type": "open_main_menu"} }
text[string] The text displayed on the button. Use an empty string for no text.
hover_text[string] (optional) The text displayed when the button is hovered with the mouse.
Example:#
 {
     "background_sprite": "background",
     "assets": [
         {"x": 0, "y": 65, "sprite": "logo"}
     ],
     "buttons": [
         {"x": 0, "y": 0, "text": "Level 1", "sprite": "button",
         "sprite_pressed": "button_pressed",
         "action": {"type": "start_level", "target": "level_1"} }
     ]
 }
This creates a screen with the background sprite assets/screen/background.png, a logo at (0, 65) with the sprite assets/screen/logo.png, and a button that opens the level level_1, using the sprites assets/screen/button.png and assets/screen/button_pressed.png.
Translation#
Overview#
Star Commander has full support for translating your game pack to different languages. This can be achieved with custom language files. Custom languages are very simple, and only consist of a single .json file in the /lang/ directory of your game pack. Each language file includes a list of keys pointing to strings. When a piece of text is defined in a game pack, like in a button or tutorial text, a key can be added. This key points to a string in the language file. The game checks if the key exists in the language file for the current language, then it uses the defined string. If it does not exist, it falls back to the directly defined string. To use a lang key in a text string, prefix the string with @. The text following the character is used as the lang key. For example if you used the string "@button_level_1", the resulting text would be the string for button_level_1 in the current language’s lang file. Lang keys cannot be used in the middle of a line, so a string like "Load Level @level_1_name" will not substitute in the text from the lang key level_1_name.
Example#
{
    "button_tutorial": "Tutorial",
    "button_level_1": "Level 1",
    "button_level_1": "Level 2",
    "button_level_1": "Level 3",
    "button_back_to_menu": "Return to Main Menu",
}